Setting Up Auto-forwarding in Gmail
Automatically forward your receipts, invoices, and transaction confirmations to Graiden. Setup takes just a few minutes.
Quick Overview
What you'll need:
- • Gmail account
- • Graiden app installed
- • 5-10 minutes
What this does:
- • Forwards your transaction emails automatically to Graiden. You control which emails are forwarded.
Get Your Graiden Email Address
Download & Login to Graiden
Log in to your account on the Graiden app.

Find Your Forwarding Address
Go to Settings → Your unique forwarding domain and copy your unique Graiden email address (e.g., you@graiden.xyz).

Open Gmail Settings
Access Gmail Settings
Visit Gmail, click the gear icon in the top-right corner and select "See all settings".

Add Your Graiden Email
Navigate to Forwarding Settings
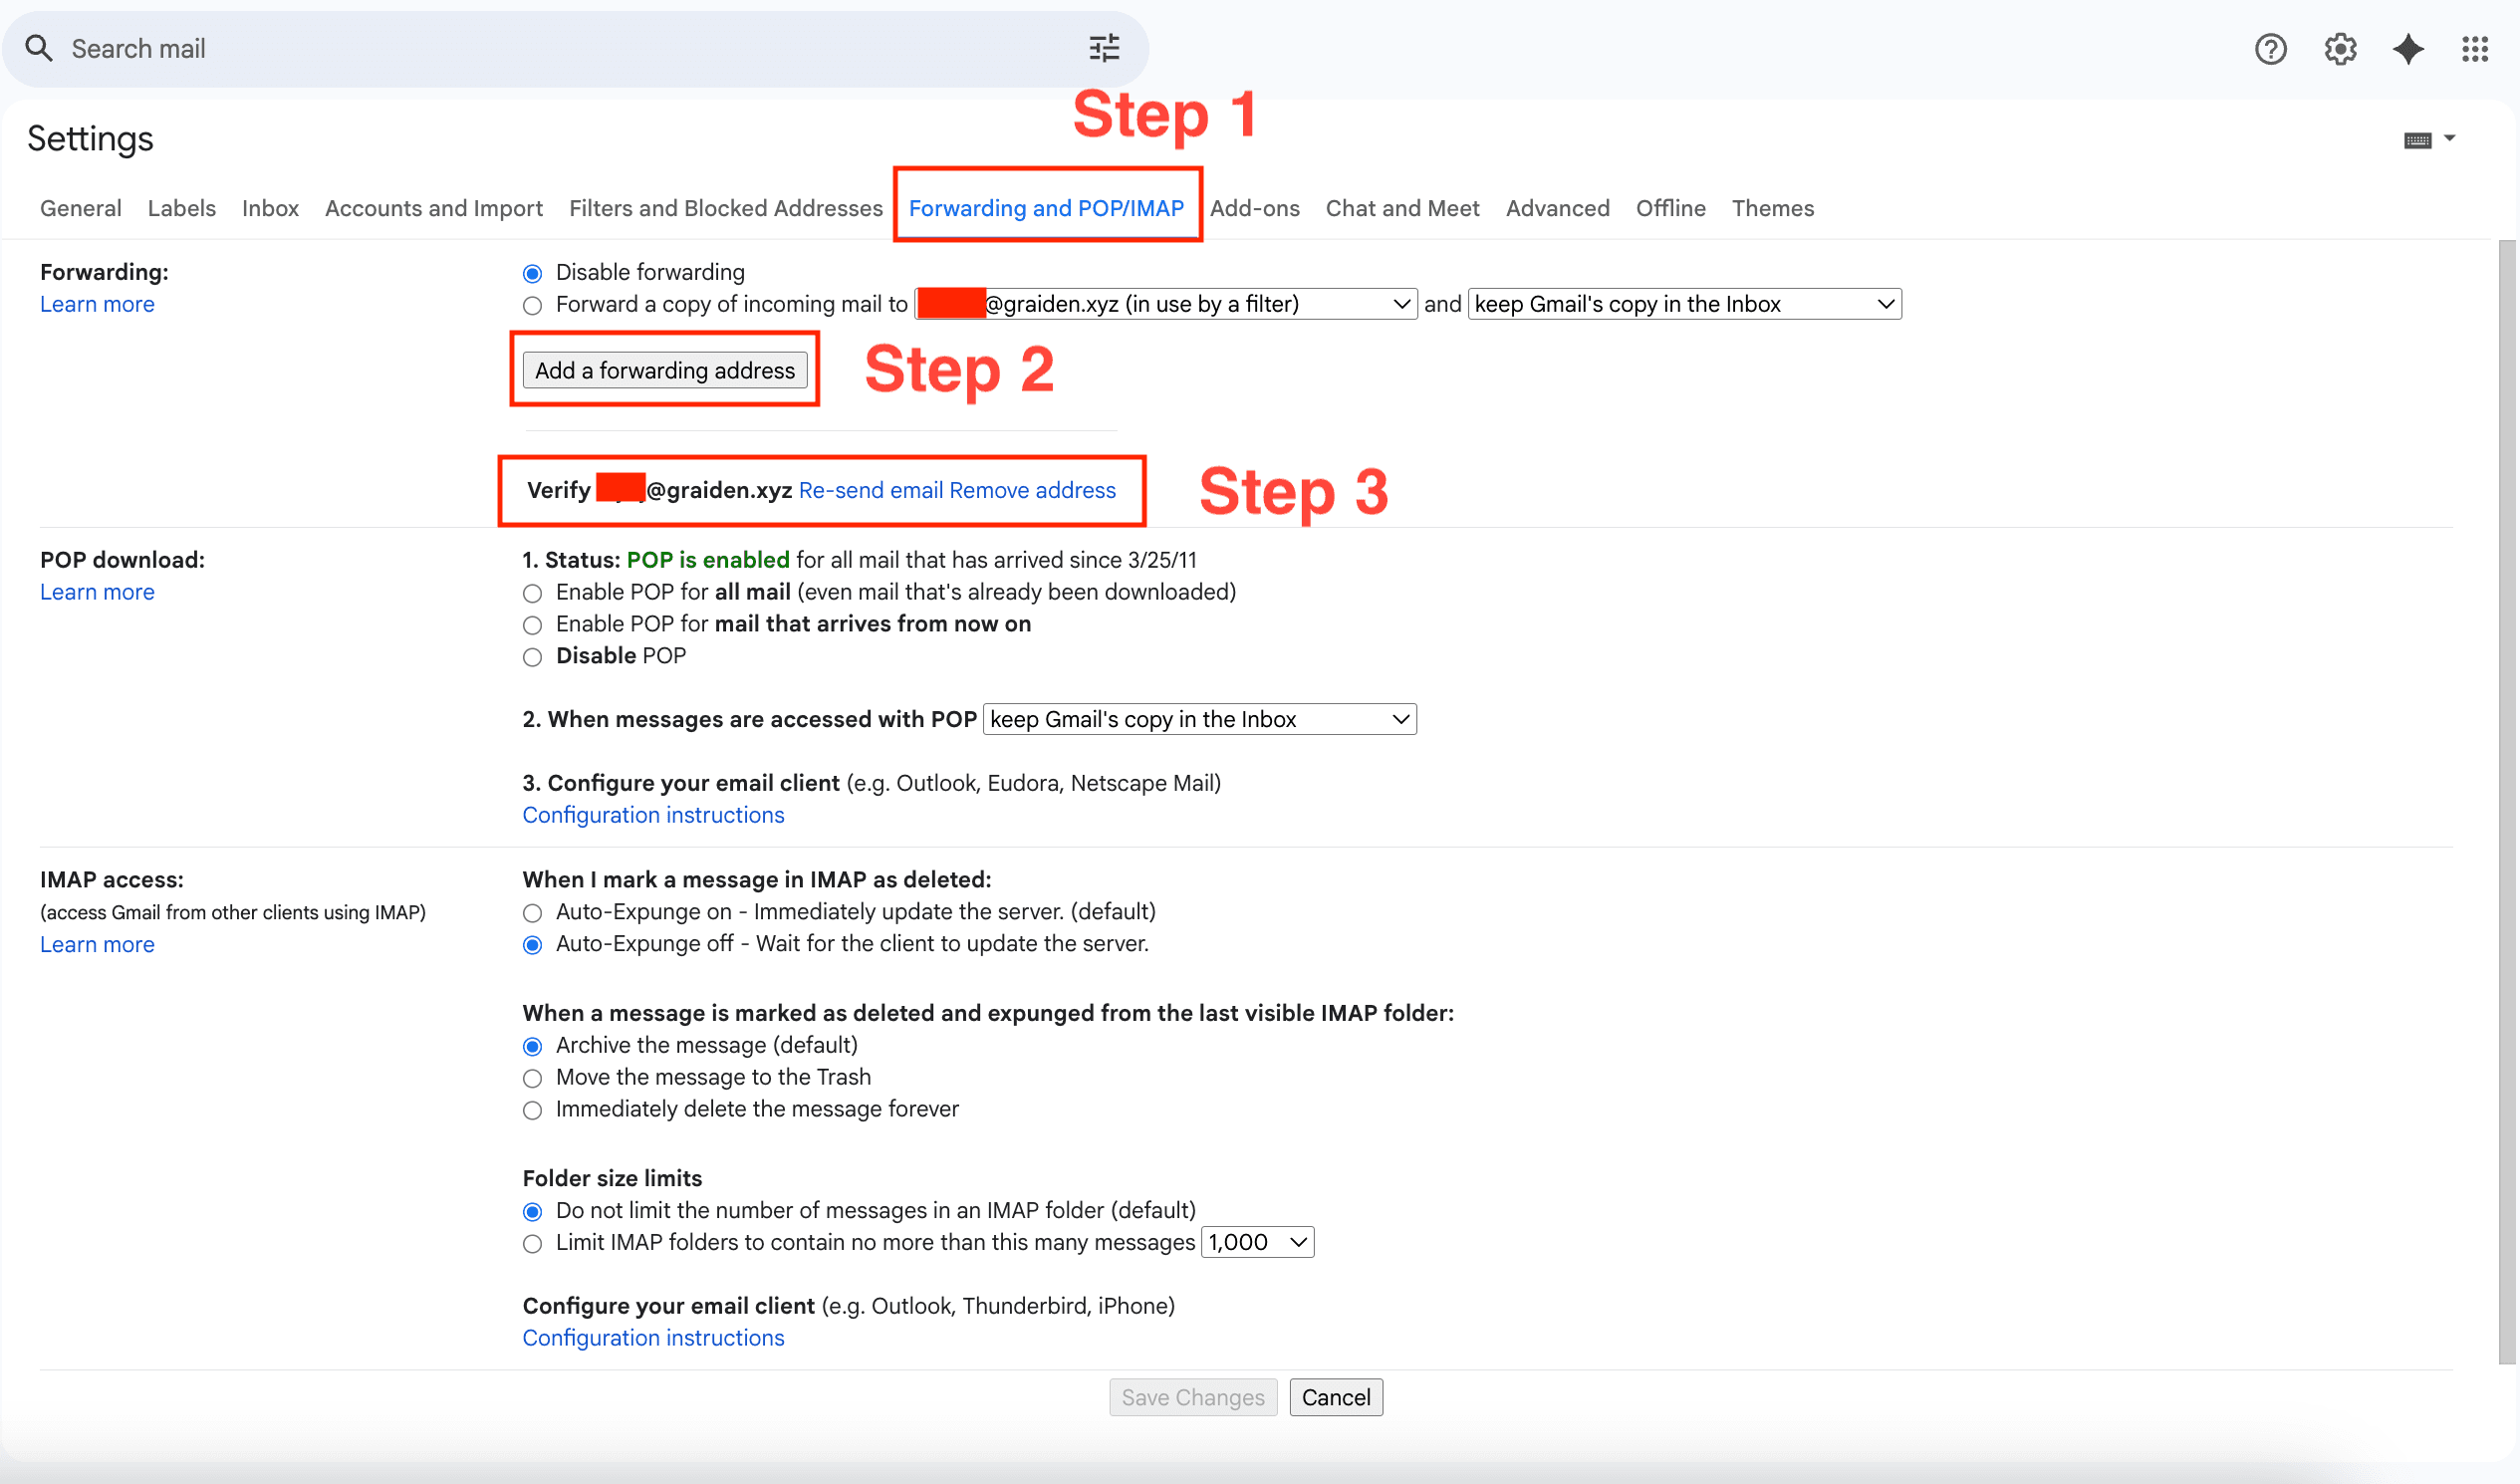
Go to the Forwarding and POP/IMAP tab.
Add Forwarding Address
Click "Add a forwarding address". Paste your Graiden address and click Next → Proceed → OK.
Verification Required
Once done, you should see a text prompting you to verify the forwarding.

Confirm the Forwarding
Check Your Graiden App
Check your "Recent Emails" in the settings page of the Graiden app for the forwarding confirmation link. It should look like this:

Tip: If you don't see the link, try refreshing the page after a few minutes.
Complete Verification
Click on the email, and click the confirmation link within to confirm the forwarding address.
Filter for Only Transaction-Related Emails
Access Filters
Go to the Filters and Blocked Addresses tab in Gmail settings.
Create New Filter
Click "Create a new filter".
Customize Your Filter
Customize your own filter, based on the sender and subject/body. If using multiple words, ensure that you wrap them in double straight quotes. Slanted/single quotes are not allowed.
Quote Examples:
CORRECT - Double straight quotes:
These are the standard straight quotes on your keyboard
❌ WRONG - Curved/smart quotes:
These are curved quotes that Gmail won't recognize
❌ WRONG - Single quotes:
Single quotes won't work for Gmail filters
Example Filter
You may refer to the image below for an example. In this example, the email MUST be from "ibanking.alert@dbs.com" and the body MUST contain the entire sentence "transaction was completed".

Recommended Approach
We recommend creating a filter for each email provider to ensure that the emails are properly forwarded. If you wish to use a single filter for all email providers, you can do so by wrapping the emails and texts in double straight quotes, separated by the OR operator. Refer to step 6 for more details.
Set Up Forwarding
Click "Create filter", then select the "Forward it to" option to ensure that the Graiden email address you added is selected.

Complete Filter Creation
Click "Create filter". If you did it correctly, you should see the created filter in the list as such:

⚠️ CRITICAL: Test Your Filter
MUST DODO NOT SKIP THIS STEP!Testing your filter ensures it works correctly before relying on it for expense tracking.
To test if this filter is working, click on the Edit button, then click on the Search button. You should see the emails you intend to forward.

From here, you may repeat the process for other emails you wish to forward. If you wish to use a single filter for all email providers, please refer to step 6 for more details.
Need Help?
If you can't get it to work, do contact our support team at support@graiden.xyz
Using a Single Filter for All Email Providers
ADVANCEDAdvanced Feature
This is an advanced feature and is not recommended for most users. It is only recommended for users who have a very large number of email providers to forward.
Single Filter Setup
If you wish to use a single filter for all email providers, you can do so by wrapping the emails and texts in double straight quotes, separated by the OR operator.
Important: Google has a very strict set of rules for filters, so please ensure that you are following the instructions carefully.
Filter Requirements
Each sentence/email provider should be wrapped in double straight quotes. Slanted/single quotes are not allowed. This matters for Gmail to recognize the filter.
Each sentence/email provider should be separated by the OR operator. This is case sensitive.
Example Implementation
Refer to the image below for an example. Note that this is just an example - you would need to create your own filter based on your own needs.

Complete Setup
Click "Continue" to proceed to the next step, then select the "Forward it to" option to ensure that the Graiden email address you added is selected.

Finalize Filter
Click "Create filter". If you did it correctly, you should see the created filter in the list as such (it may look different depending on your filter settings):

⚠️ CRITICAL: Test Your Advanced Filter
MUST DODO NOT SKIP THIS STEP!Testing your advanced filter is even more critical due to its complexity. Verify it works before relying on it.
To test if your filters are working, click on the Edit button, then click on the Search button. You should see the emails you intend to forward.
CRITICAL WARNING
DO NOT FORWARD ALL YOUR EMAILS
Forwarding all your emails to Graiden will result in loss of your privacy & usage of all your limits. Prevent this by selecting the "Disable forwarding" option:

Setup Complete!
Voila! That's it! Your Gmail is now set up to automatically forward relevant emails to Graiden.
What happens next?
- • All forwarded transactions will be automatically categorized
- • Expenses will be logged in your Graiden app
- • You'll save time on manual expense entry